"I can't drive 85"
11.11.2012
I can't drive 55
After two stove loads full of wood, the 60ft metal shop came up to temperature such that the substrate made it to 55 deg F.......minimum application temp for my non skid paint.
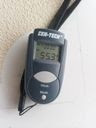
the above photograph is an example of poor quality imagery.
Since I dropped my really nice Cannon camera off the deck of the boat onto the cement floor, I have been reduced to taking photos with a phone. My I mac doesn't recognize the device since I switched from an iphone to a android so I had to load the photo onto the desktop of windows computer, attach it into an email to myself, go to my mac, open up my email account on this computer, go to finder, drag copy the photo onto the mac desktop, open blogger, then import the photo into this post.........5 back doors to get a photo into this post this time is no good.
regardless, you can barely see 55.3 F on my little non contact thermometer.
funny thing: While trying to get the surface time up to 55, they played this on the radio today.
since this is the original 1980s video, they make you watch a 30 sec commercial. click the link, go get a drink of water, then come back and watch it.
Now it's......
"I can't drive 85"
"I can't drive 85"
11.09.2012
11.03.2012
non skid; non fall overboard.
Out of the thousands of methods of applying nonskid, I flipped a coin and decided to use System Three LPU polyurethane with a cross linker; applied with a small fuzzy roller then sprinkled granulated polycarbonate over the deck while it was still wet. I let that dry then came back over it with another coat of LPU paint to lock the granules in place. I'm pleased with the result, although it's a bit difficult to get a perfectly uniform sprinkle pattern over the deck. I settled in on using a salt shaker sprinkling it from about 4 ft above the surface.
If I ever slip overboard it will be because I've had one too many margaritas or two too many sips of rum not because of lack of traction.
aft port side non skid
stepping up over the kick up rudder boxes
aft, starboard side non skid
10.26.2012
She has a name......
"Mariana" hailing from http://en.wiktionary.org/wiki/hail_from Hood River Oregon
when removing graphic vinyl, sometimes it tends to stick to things...
Here I am with my buddy John who happens to have a really nice CNC vinyl cutting machine.
John ripping the last transfer tape off of the "A"
stern view of Mariana
of the ten million fonts out there, I chose this one because it seems to suggest the present age and at the same time; modernity
Here's my buddy John after the fact.
10.06.2012
The Fog of war
starboard side topcoat complete.
You are looking at the bow of the starboard side hull. The photo looks like the hull has been constructed out of billowing plastic because it reflects the plastic film sheeting that is being used as my spray booth. The finish turned out very nice but not unlike being over served at an establishment, a few areas suffered from slight over application. Fortunately, this is Awlgrip 2000 acrylic polyurethane and imperfections can be buffed out without much difficulty.
9.25.2012
Bottom Topcoat
What a nerve wracking, toxic job this was. It's a good thing I don't do this for a living........ I am very glad that the underside topcoat is behind me.
I think it turned out just fine. I did have one or two slight "sags" but that's why they make 3M Finesse-it™ http://www.westmarine.com/webapp/wcs/stores/servlet/ProductDisplay?catalogId=10001&storeId=11151&productId=21762&langId=-1#.UGKdgdCXSaE
9.23.2012
Getting the waterline just right.......
Here I am using a length of tube filled with colored water to mark the waterline mark on the hulls. I first marked reference lines on the hulls which gave me a place to start. The waterline on the bow of the boat is 57 1/2 inches below the deck surface and the waterline mark on the stern is 41 inches below the part of the deck where the steps begin.
With those marks, I used a tube filled with water to make sure that the boat was sitting horizontal to the earths surface by holding both ends together on the mark and taping it in place, then moving it all along the length of the hulls marking every 1 ft.
This turned out to be more accurate than the "cheap" Ryobi laser level that I had been using.
It became necessary for me to establish the waterline marks on the hull because the Awlgrip topcoat paint isn't intended for "below the water line".
Tomorrow: paint inner port and starboard hulls
9.19.2012
Top Coat
Day one :
Cabin top
rudder boxes
targa bar
Painting is a nerve wracking venture. Lot's of things have to go right for the end result to be satisfactory. If one or more things go wrong, the job can cascade into a complete disaster.
After going over the areas that I intended to paint with a smooth cloth, I committed to mixing paint and beginning the application of the topcoat.
After mixing my paint, I began to adjust and make final preparations to the Binks model 95 gun and pressure pot. Just as I was screwing the flow control valve out a bit, the spring popped out and went flying across the shop.
You can't paint a boat if your paint gun has disintegrated. At this stage, my heart rate began to rise such that I started seeing small bunny rabbits peek their heads into the shop. I crawled around on my hands and knees until I found it.
I set the gun pressure to 46 psi and the pressure pot to 12 psi and began...........
Cabin top
rudder boxes
targa bar
Painting is a nerve wracking venture. Lot's of things have to go right for the end result to be satisfactory. If one or more things go wrong, the job can cascade into a complete disaster.
After going over the areas that I intended to paint with a smooth cloth, I committed to mixing paint and beginning the application of the topcoat.
After mixing my paint, I began to adjust and make final preparations to the Binks model 95 gun and pressure pot. Just as I was screwing the flow control valve out a bit, the spring popped out and went flying across the shop.
You can't paint a boat if your paint gun has disintegrated. At this stage, my heart rate began to rise such that I started seeing small bunny rabbits peek their heads into the shop. I crawled around on my hands and knees until I found it.
I set the gun pressure to 46 psi and the pressure pot to 12 psi and began...........
port side cabin top
kick up rudder boxes
details of frangible shear pin holders which allow rudders to kick up if some goofball sailor runs out of water.
I learned a great deal today and was able to make fine adjustments to my equipment to optimize the application process.
tomorrow is a big day:
port and starboard mid cabin sides
forward deck
bow beam
aft cabin panel
aft cabin tops and sides
9.03.2012
how many sanding pictures can I post?????
am improvised scaffolding to provide access to my targa bar.
My paint mixing table.
the deck primed in Awlgrip 545 white base.
forward deck primed in 545
I wasn't really happy with the transition radius between the cabin and the top deck so I spent an entire afternoon applying filler along the radius and working it down into a neat and clean transitional radius. I used a soft foam block, some 100 grit paper and a stainless steel wire brush to unclog the paper as I went along.
I'm getting dangerously close to being ready to lay down the final topcoat!!!
I chose Awlgrip " Stark White" as my final color as it actually has a slight warm color that will go well with my sand colored non skid areas that I will use on the decks.
Breathing a little easier.....
Although I replaced the oil in my vintage craftsman compressor that I have been using as a forced air respirator source with vegetable oil, I took the advice of a wise blog reader and devised a nice carbon filter cartridge that I placed in line with my full face mask. I made this canister by purchasing two carbon filter elements and fitted them in side two large PVC end caps then drilled holes for inlet and outlet tubes then taped the whole thing together.
the resulting air is a fresh as a daisy and it makes painting a real pleasure. It cost about 16 bucks to make and it works beautifully.
8.26.2012
Integrated H2O tanks
While waiting for the Awlgrip paint materials to arrive, I decided to use the time to construct the panels necessary to create built in water tanks. These tanks will be installed on both port and starboard side hulls along the bilge area just in front of the forward bulkhead. Although it is good practice to keep weight central, these tanks may come in handy if we really feel the need to stockpile water. When not in use as water tanks, they could also be used as "dry" storage areas.
Two water tanks can be built by bonding these four panels into the lower sections of both hulls.
Here, I've placed 24 oz triaxial glass on both sides of 3/4 inch structural foam core and for good measure, I also added a bit of unidirectional reinforcements to make the panels a little stronger in case heavy seas cause the water in the tanks to slosh about. I also intend to install cross baffles with holes in them to dampen internal water movement.
8.22.2012
A textured surface
Here is an experimental method of creating a textured surface on a bulkhead or floor panel:
I found this interesting roller at Wal Mart. It comes in a truck bet liner kit and it's made for apply a truck bed liner that comes in a can. If you happen to have a truck, maybe now's the time to freshen up your truck bed and after the job, you can clean the roller and you use it to create a textured surface on the floor of your bridge deck. I'm sure you can find this type of roller somewhere but you can also find just about anything in a Walmart if you wander around at night in hopes of finding consumer goods that will fill the empty void in your soul.
In addition to adding a non skid surface to the bridge deck, I also wanted to bump up the volume a bit and create a textured, modeled surface that would be extra grippy on the bridge deck and the underside of the boat. I don't [lan on spending too much time clinging to the bottom of an upturned catamaran but should the need arise sometime in the future, I don't want to keep slipping off into the ocean every time a wave smashes of the boat.
to do this, mixed up a batch of quart batch of epoxy and added a cup of cabocil to give it some body. I then masked off the areas and rolled on this slightly thickened mixture. I picked a nice warm day so that I could keep going over the area as the mixture cured. This is how it turned out.
under side of the cat. note the really beefy support webs that give the bridge deck supreme rigidity.
a close up of the exterior cockpit floor
In the next photo that I haven't actually added, what you will not see a coat of epoxy primer. Since I intend to paint this surface and the textured surface would preclude me sanding it to promote adhesion, while the epoxy was simi cured, I "hot coated" it with an epoxy primer,
I also plan on adding what I think will be a novel safety feature: I intend to paint four large rectangles with international epoxy paint and embed aircraft runway reflective glass spheres into the underside of this cat. My logic is that if I a search is ever attempted with a helicopter at night, I'd like to make the job easier.
Stay tuned on......
8.09.2012
100 Grit
In my mind, the task at hand is to get this cat painted. In the professional marine industry terms, this is sometimes just called applying the "topcoat".
It has taken me about 5 years to arrive at the point where a top coat can be applied. Of course, one of the main reasons that it has taken this long is that the boat did not exist yet. So, like they say, most off the work required for a paint job is in the preparation. When it comes to rather involved projects, I have found that it helps to break things down into various doable stages. Stage 1: build the catamaran. stage 2: paint it.
I like to tell myself that I am at stage 2 now but I am also finding the need to break this task down into a smaller steps and it all seems to come down to surface finish.
http://en.wikipedia.org/wiki/Surface_finishing
So, the challenge that I have given myself is to apply a #3 architectural finish to every external surface of the boat and the humbling thing to remember is that's darn well close to a # 4 dairy sanitation finish. The only real reason that I have chosen that level of smoothness is that it is a point where Awlgrip 545 primer can be applied so that full hiding of surface irregularities can be expected.
It has taken me about 5 years to arrive at the point where a top coat can be applied. Of course, one of the main reasons that it has taken this long is that the boat did not exist yet. So, like they say, most off the work required for a paint job is in the preparation. When it comes to rather involved projects, I have found that it helps to break things down into various doable stages. Stage 1: build the catamaran. stage 2: paint it.
I like to tell myself that I am at stage 2 now but I am also finding the need to break this task down into a smaller steps and it all seems to come down to surface finish.
http://en.wikipedia.org/wiki/Surface_finishing
So, the challenge that I have given myself is to apply a #3 architectural finish to every external surface of the boat and the humbling thing to remember is that's darn well close to a # 4 dairy sanitation finish. The only real reason that I have chosen that level of smoothness is that it is a point where Awlgrip 545 primer can be applied so that full hiding of surface irregularities can be expected.
7.25.2012
final filling
a few more pesky grooves.... In this case, I shouldn't really worry too much about some of these areas because they will be covered with a slightly textured non - skid paint which will tend to hide places like this. It's situations like this that cause a person to spend a little too much time in the shop and not enough time sailing.
crazy expensive System Three Quickfair.
If this product wasn't so easy and nice to use, I would continue to mix up my own fairing compound with epoxy and glass micro balloons. However, using this product as the final step in working out all the surface defects has really been the ticket and well worth the price.
Here are some of my favorite tools for applying this filler. From left to right:
- a small flexible steel blade - works nice for filling small gouges and divots
- a 10 inch sheet rock blade - great for filling flat surfaces with thin skim coats
- a rubber spreader - allows you to bend it into convex and concave corners while spreading filler
- common body filler - spreader. ( down side of this particular one is that when you drag it over anything but a perfectly smooth surface, the edge degrades and sometimes sheds small yellow ribbons into your work. (The spreaders available at automotive stores that are a tan / beige color actually work better )
7.21.2012
Grandmas Isocynate biscuits.... AWLGRIP primer surfacer
AwlGrip contains isocynates and other stuff that will do great harm to carbon based life forms like myself. In the past, neglegent release of this compound was responsible for over 2000 deaths in Bhopal india. . http://en.wikipedia.org/wiki/Bhopal_Disaster To prevent myself from becoming another victim, I configured a nice forced air breathing apparatus.
If you happen to have a vintage craftsman air compressor, I have found that it is possible to use one to configure a nice, workable forced air breathing apparatus. I did this by flushing the crank case of this old slow speed four cylinder compressor and replacing the lubricant with vegetable oil. I attached a long flexible tube to the outlet and ran it to one of the filter elements that screw on the a full faced mask. To do this, I simply drilled a hole in the side of a filter unit and taped up the front inlet of both filters. When worn, it sort of smells like my grandmothers kitchen when she was making biscuits. That's a much nicer smell than Isocynate.
Here I am sitting on the starboard side aft bridge deck after painting the boa† with her first coat of AWLGRIP 8003 high build primer surfacer. This stuff is really nice. It's a two part epoxy primer that cures into a very robust coating that sands as smooth as glass.
port side stern boarding steps
port side bow
starboard bridge deck, targa bar and stern dingy landing deck.
port side view.
7.10.2012
ladder, bucket, anchor
Although this may seem like an off target post, I include it as an example of why it is sometimes nice to have a few random things lying around the shop. As luck would have it, the anchor height = ladder + bucket.
In preparation for painting, I realized that I had not yet installed the anchor line tube into the forward portion of the lower bridge deck. To do this, it was necessary for me to gather up the ground tackle and temporarily put all the pieces together to determine the proper angle of the entrance tube. This small tube is not shown in the photo but it needed to be installed so that under tension, the anchor rode will be concentric with the axis of the anchor roller and the power windlass.
This will be my hurricane anchor. It is a Fortress FX - 85 which has a working load of 5200 lbs.
* in the lower portion of this photo, you can also see the mast which is suspended from the shop rafters at head level. As a reminder if it's existence, I often bash my head into it.
7.09.2012
Visual proportioning
As a first step in the painting process, it is important to make sure that the boat is the right shape. Since all joints are covered with double biased tape, this results in a slight surface discontinuity. One way to deal with this is to sand the edges of the tape then apply some filler compound. I have found it best to use a mixture of epoxy and glass micro balloons over all the seams, sand them and then apply a ready formulated faring compound. System Three offers a really nice product called "QuickFair" and although it is sinfully expensive, if you apply it with a blade, very little final sanding is required.
To mix the filler. here's a little trick I taught myself that makes mixing easier. I call it visual proportioning. I mark out a proportional surface area on a cookie sheet and cover the areas. By varying the thickness of each component, it is possible to control the volume of faring compound required for particular jobs.
two parts A to one part B filler
visual proportion
mixing
smoothing and sanding the port side stern steps and kick up rudder box.
Subscribe to:
Posts (Atom)


-1.jpg)

